We will build a database service using SQLite and allow users to access it via a REST API using HTTP methods such as POST and PUT. In addition, we will get to know why JSON web tokens is a suitable way to protect rest API instead of digest and basic authentication. Before we proceed, let’s understand the term JSON web tokens, REST API and Flask framework.
JSON Web Tokens
JSON web token, also known as JWT, is the secure way of transferring random tokens between two parties or entities. JSON is usually made up of three parts as the following.
Payload Header Signature
JSON uses two types of structure forms when transferring data or information between two parties.
Serialized Deserialized
The serialized form is used when transferring data to the network through each request and response whilst the deserialized form is used when reading and writing data to the web token. In the serialized form, there are three components.
Header Payload Signature
The header component defines the cryptographic information about the tokens. For example:
Is it signed or unsigned JWT? Define algorithm techniques
The deserialized form, unlike the serialized form, contains two components.
Payload Header
REST API
API (application programming interface) allows communication between two applications to retrieve or submit the data. There are two popular types of APIs – web and system API. In this article, we will only look at the web API. There are two types of web API.
Request – Response API: Rest, GraphQL, Remote Procedure Call (RPC) Event-Driven API: WebHooks, Web Sockets, HTTP Streaming
REST API falls under the request-response category. It makes use of HTTP methods such as GET, POST, and PUT to perform API operations. A classic example is when a user sends a GET method to the web service to request for or retrieve a specific resource or a collection of resources. The server then sends back the specific resource or collection of resources back to the user who requested it.
Flask Framework
Flask is a framework based on python. It is a micro-framework used by python developers to build rest API. It is called a micro framework because it allows developers, for instance, to add custom authentication and any other backend system based on preferences. Let’s get it started with the implementation. My system setup is as follows.
Ubuntu as OS Python 2.7+ Postman
Set up a virtual environment using virtualenv
We need to set up a virtual environment to ensure that some packages will not conflict with system packages. Let’s use the virtualenv to set up a new virtual environment. Assuming you have the pip command available on your system, run the following command via pip to install. If you don’t have pip on your machine, then follow this documentation to install pip on your system. Next, let’s create a directory to store or hold our virtual environment. Use the mkdir command shown below to create a directory Change into the flaskproject directory using the following command Inside the flaskproject directory, use the virtualenv tool to create a virtual environment as shown below: After you have used the virtualenv tool to create the virtual environment, run the cd command to change into the flaskapi directory as the virtual environment and activate it using the command below. Execute all tasks related to this project within the virtual environment.
Install packages using pip
Now it’s time to install packages such as the flask framework and PyJWT which we will use to build the rest API and other necessary packages for our API project. Create a requirements.txt file with the following packages. Install them with pip.
Set up a database
Let’s install SQLite. Create a database named the library. Inside this database, we will create two tables, namely the Users and Authors table. Users table will contain registered users. Only registered users can have access to the Authors table. Authors table will store authors’ information or details such as the name of the author, country of birth and so on submitted by the registered users. Create the database using the following command: You can check whether you have successfully created the database by using the command below: Open a new terminal and execute the following in the virtual environment we created earlier. Paste the following code inside the file named app.py The first line in the code above imports packages such as request and jsonify. We will make use of request to keep track of the request-level data during a request and use jsonify to output responses in a JSON format. On the next line, we imported SQLAlchemy from flask_sqlalchemy in order to integrate SQLAlchemy features into the flask. From werkzeug.security, we imported generate_password_hash to generate password hash for users and check_password_hash to check the user’s password when comparing password submitted by users with users’ passwords stored in the database. Finally, we imported uuid also known as universal unique identifiers to generate random id numbers for users. Still, inside the app.py file, implement the configuration settings for the library API using the code below inside the app.py file. Place the following code beneath the import statement. Now create two models for the Users and Authors table as shown below. Copy and paste the code inside the app.py file. Place the code below right beneath this database setting db = SQLAlchemy(app)
Generate Users and Authors Tables
On the terminal, type the following code inside the virtual environment to generate or create tables for both the Users and Authors tables as shown below Afterward, open the app.py file inside the virtual environment and create another function. This function will generate tokens in order to allow only registered users to access and perform a set of API operations against the Authors table. Place this code beneath the database model for the Authors table
Create routes for the users table
Now let’s create a route to allow users to register for the Authors API via a username and password as shown below. Again open the app.py file inside the virtual environment and paste the following code beneath the function token_required(f) Inside the virtual environment, create another route in the app.py file to allow registered users to login. When a user logs in, a random token is generated for the user to access the library API. Paste the code below beneath the previous route we created. Still, within the virtual environment, create another route in the app.py file to get or retrieve all registered users. This code checks for all registered users in the Users table and returns the final result in a JSON format. Paste the code below beneath the login route
Create routes for the authors table
Let’s create routes for the Authors table to allow users to retrieve all authors in the database, as well as delete authors. Only users with valid tokens can perform these API operations. Inside the app.py file, create a route for registered users to create new authors. Paste this code beneath the route which allows a user to retrieve all registered users. Next, create another route to allow a registered user with a valid token to retrieve all authors in the Authors table as shown below. Paste this code below the route which allows a user to create a new author. Finally, still inside the app.py file, create a route to delete a specified author as shown below. Paste this code beneath the route which allows a user to retrieve a list of authors. Afterward, save and close the app.py file inside the virtual environment.
Testing the library API with Postman
In this section, we will make use of a postman tool to send a request to the database services. If you don’t have a postman on your machine, you can find out how to download and install it here. Apart from the postman, we can make use of other tools such as Curl to send requests to the server. Open a new terminal and type the following: The command postman will cause your web browser to display the page below:
You can decide to sign up and create a free account but we will skip and get direct access to the app to test the library API as shown below:
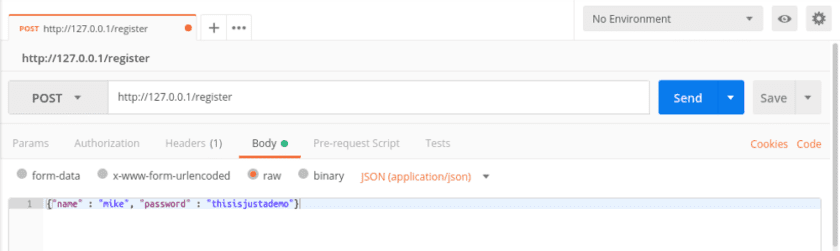
In this section, we will allow a user to register for the library API by providing a username and a unique password in a JSON format using the POST method using the steps below:
Click on the tab labeled Body Then select the raw button and choose the JSON format enter a username and password to register as shown in the screenshot Beside the send button, insert the following URL http://127.0.0.1/register Finally, change the method to POST and press the send button.
It will display the following output as shown below:
Now we have successfully registered a user. Let’s go-ahead to allow the user who just registered to login in order to generate a temporary random token to access the Authors table using the following steps:
Click on the authorization tab. Under the type section, select basic authentication. Then fill the username and password form with the username and password you registered with previously. Finally, press the send button to login and generate a random token.
Once the user login successfully, a random token is generated for the user as shown in the screenshot. We will make use of the generated random token to access the Authors table.
In this section, we will add an author’s information to the Authors table via the POST method using the following steps:
Click on the headers tab Include the following HTTP headers shown in the screenshot
Next, click on the body tab and enter the details of the new author Then press the send button to add the author’s details to the Author’s table
You can also retrieve authors’ information in the Authors table via the following:
Make sure your generated token is in the headers section. if it is not there, you need to fill it with your token. Beside the send button, enter this URL http://127.0.0.1/authors Then change the HTTP method to GET and press the send button to retrieve the authors details.
Finally, you can delete the author(s) in the Authors table via the DELETE method using the following steps:
Make sure your token is still in the headers section. You can check the headers tab to ensure the necessary information is in place. Beside the send button, enter this URL http://127.0.0.1/sam Then press the send button to delete the user you specified.
You can find the complete source code on Github. You can clone it and check it out on your machine.
![]()
![]()


![]()
![]()
![]()
![]()

![]()


![]()
![]()
![]()

